How to Convert Excel to JPG: A Beginner's Step-by-Step Guide
Learn how to convert Excel spreadsheets to high-quality JPG images with our comprehensive guide. Perfect for presentations, reports, and social media sharing.
In today's digital age, transforming data into visually appealing formats is crucial for effective communication. Without complex software, you can convert Excel spreadsheets to high-quality images like JPG in just seconds! Whether you're preparing presentations, sharing data snapshots on social media, or creating reports, TableVivid helps you easily convert Excel to JPG or other image formats. This step-by-step guide is designed for beginners to quickly master this skill.
Why Convert Excel to JPG?
- Visual Appeal: Images are easy to share and view, perfect for presentations or social media.
- Simplified Sharing: Images provide quick data snapshots, better than complex spreadsheets.
- Compatibility: Image formats like JPG have universal compatibility, no specific software needed.
- Professional Reports: Clear images enhance the visual impact of reports, blogs, or documents.
What You Need to Convert Excel to JPG
To successfully convert Excel files to JPG, you need:
- An Excel file (.xlsx or .xls format) containing the data or tables you want to convert.
- Access to TableVivid, an online tool that simplifies Excel to JPG conversion.
Step-by-Step Guide to Convert Excel to JPG Online
Step 1: Prepare Your Excel File
Before converting, ensure your Excel file is ready:
- Clean Your Data: Remove unnecessary rows, columns, or formatting to keep your spreadsheet clean.
- Highlight Key Data: Use bold, colors (like font colors, background colors) to emphasize important cell content.
Step 2: Visit TableVivid Website
- Open your web browser (Chrome, Firefox, Safari, etc.).
- Type
https://tablevivid.com/in the address bar and press Enter.
Step 3: Upload Your Excel File
- Click the "Choose File" button and select your Excel file.
- TableVivid supports .xlsx and .xls formats, with local browser processing ensuring data privacy and security.

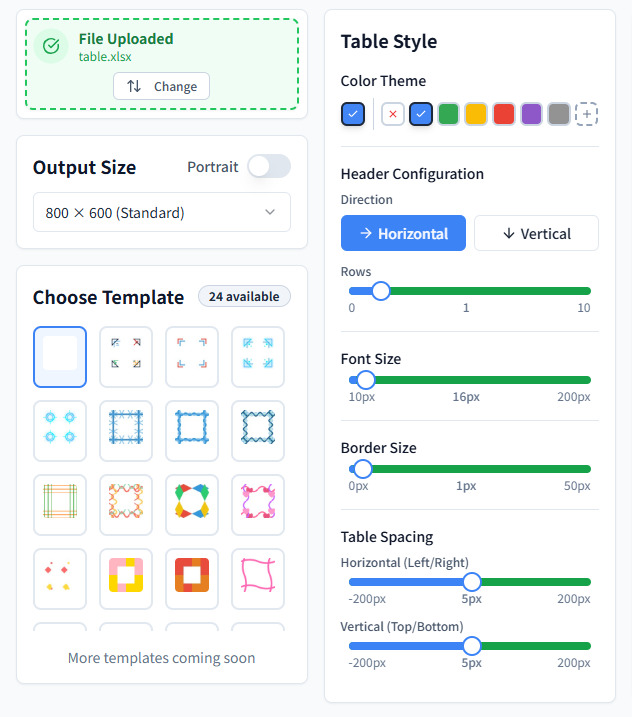
Step 4: Customize Output (Optional)
TableVivid offers rich customization options:
- Choose Output Size: Supports standard, HD, 4K, or paper sizes like A4 (A4 for printing, 4K for high-definition display).
- Select Border Templates: Provides simple lines, decorative patterns, shadow gradients, and other templates suitable for business or creative scenarios.
- Adjust Image Settings: Customize color themes, font sizes, border thickness.
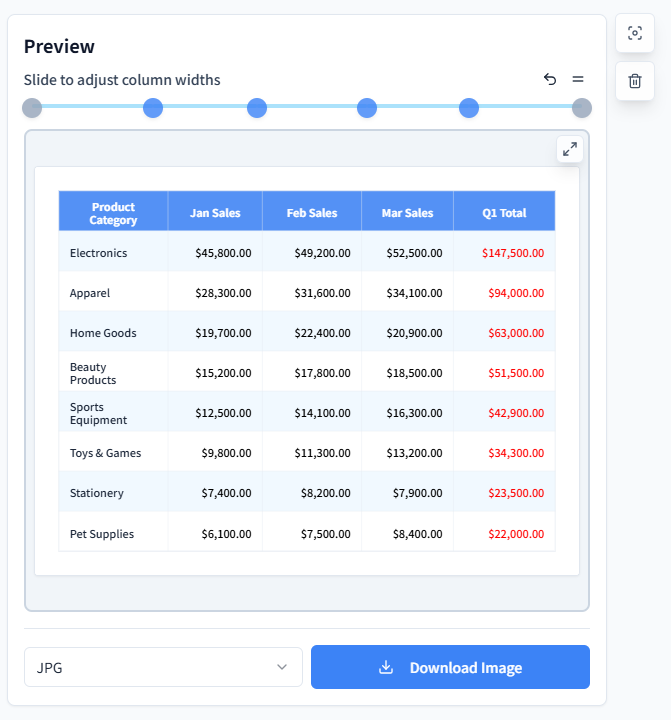
- Preview Output: Check data and styling to ensure conversion results.
Step 5: Download and Check JPG
After uploading and customizing:
- Select output format (JPG or others).
- Click the "Download Image" button to get your image.
- Check output quality, and if adjustments are needed, modify settings and convert again.
You have successfully completed Excel to JPG conversion!
Alternative Methods to Convert Excel to JPG
While TableVivid is the preferred choice, if needed, you can also try other methods to convert Excel to JPG:
- Manual Screenshot:
- Open your Excel file.
- Take a screenshot of the desired area (e.g., using Snipping Tool on Windows, Command+Shift+4 on Mac).
- Save the screenshot as JPG.
- Note: This method may result in lower quality and requires manual cropping.
- Excel Built-in Features:
- Copy the desired Excel range.
- Paste it into an image editor (e.g., Microsoft Paint or Photoshop).
- Save the result as JPG.
- This method is time-consuming and may not perfectly preserve formatting.
- Other Online Tools:
- Other online websites also offer Excel to JPG functionality, but compared to TableVivid, they may have different features or limitations.
For the simplest and most reliable experience, TableVivid remains the recommended choice.
Troubleshooting Common Issues
If you encounter problems when converting Excel to JPG, here are some solutions:
- File Won't Upload: Ensure your network connection is stable and the file isn't corrupted.
- Poor Image Quality: Adjust resolution settings or simplify Excel formatting.
- Data Gets Cropped: Check if data is within the selected range or adjust spreadsheet layout.
If problems persist, the TableVivid team can provide assistance.
Conclusion
Converting Excel to JPG is a simple process that can significantly improve how you share and present data. By following this beginner-friendly guide and using reliable tools like TableVivid, you can convert Excel to JPG with just a few clicks. Whether you're creating professional reports, sharing data online, or preparing presentations, this method ensures your spreadsheets transform into visually appealing, easily shareable images.
Ready to get started? Visit TableVivid now and experience hassle-free Excel to JPG conversion!